Are you a dog lover with an active pooch? Do you have some extra space in the yard? Well, you have come to the right place! Treat your beloved pet with materials and handiwork and give your yard a makeover. Sometimes, all the training parks are either far away or not in the area, but this won’t be a problem once you have your own. This will not only let you train without wandering off far away from the summer house, but benefit your dog by keeping it agile and exercised.
Contents
Why Build a Dog Training Park?
A backyard dog training park offers numerous advantages. It provides a safe and controlled environment for your dog to exercise, learn new skills, and burn off excess energy. Having a dedicated space for training can help strengthen the bond between you and your pet while also improving their behavior and obedience. Plus, it’s a great way to save time and money on trips to public dog parks or training facilities.
Planning Your Dog Training Park
Before you start building, carefully planning your dog training park is important. Consider the size of your backyard and how much space you can dedicate to the park. Consider your dog’s needs, such as size, age, and energy level. List the features you want to include, such as agility equipment, play areas, and rest zones.
Next, create a rough sketch of your park layout. This will help you visualize the final result and make necessary adjustments before you begin construction. Leave enough space for your dog to run and play freely.
Materials You Will Need
All the materials and tools needed for the agility course can be found at your local hardware store. Let’s start with the basics:
- wood or plywood
- nails
- saw
- drill
- metal connectors
Bonus points if you already have some spare wood in your shed, so let’s put it to good use. Recycling is always a great idea. If you feel like removing old furniture, any old shelves or closets can be handy.
Safety First!
When taking on a DIY project like this, your pet’s safety is the priority. While building each part of the obstacle course, check to ensure no nails are sticking out of the wood. If there are any sharp edges, take your time to sand them down. Every part of the course must be sturdy and well-assembled, especially if you have a larger dog. Always consider your dog’s age, height, and any health issues when building each part of the course. Any small part of the obstacles can quickly turn into a choking hazard, so every bit and piece has to be secured. Use glue if needed. Don’t forget about your safety! Get yourself a good pair of safety goggles or face shields, gloves, and a dust mask to protect you from sawdust. If you have your workshop and any experience, you can go right ahead and get started. If not, be extra careful, take your time to learn how to use the tools and ask for help.
Starting With the Basics
Visualize where exactly you want the obstacle course to be. It doesn’t necessarily have to take up your whole lawn; you can always start small. Ensure your canine friend has enough space to run freely from one obstacle to another. Check the terrain: not everyone has a perfectly flat lawn. Try your best to avoid bumps, holes, or any uneven part of the lawn. Always look for the flattest part of your lawn so the course has a sturdy base. Decide whether you want the course to be accessible to your dog 24/7. If you aren’t sure, it’s better to put a fence around the course and let your dog train there under surveillance. Now, let’s go ahead and make the obstacles.
Usually, the course comprises a weave pole, see-saw, tunnel, steps for climbing and a high jump. We’ll start with the easiest obstacle.
1. High Jump
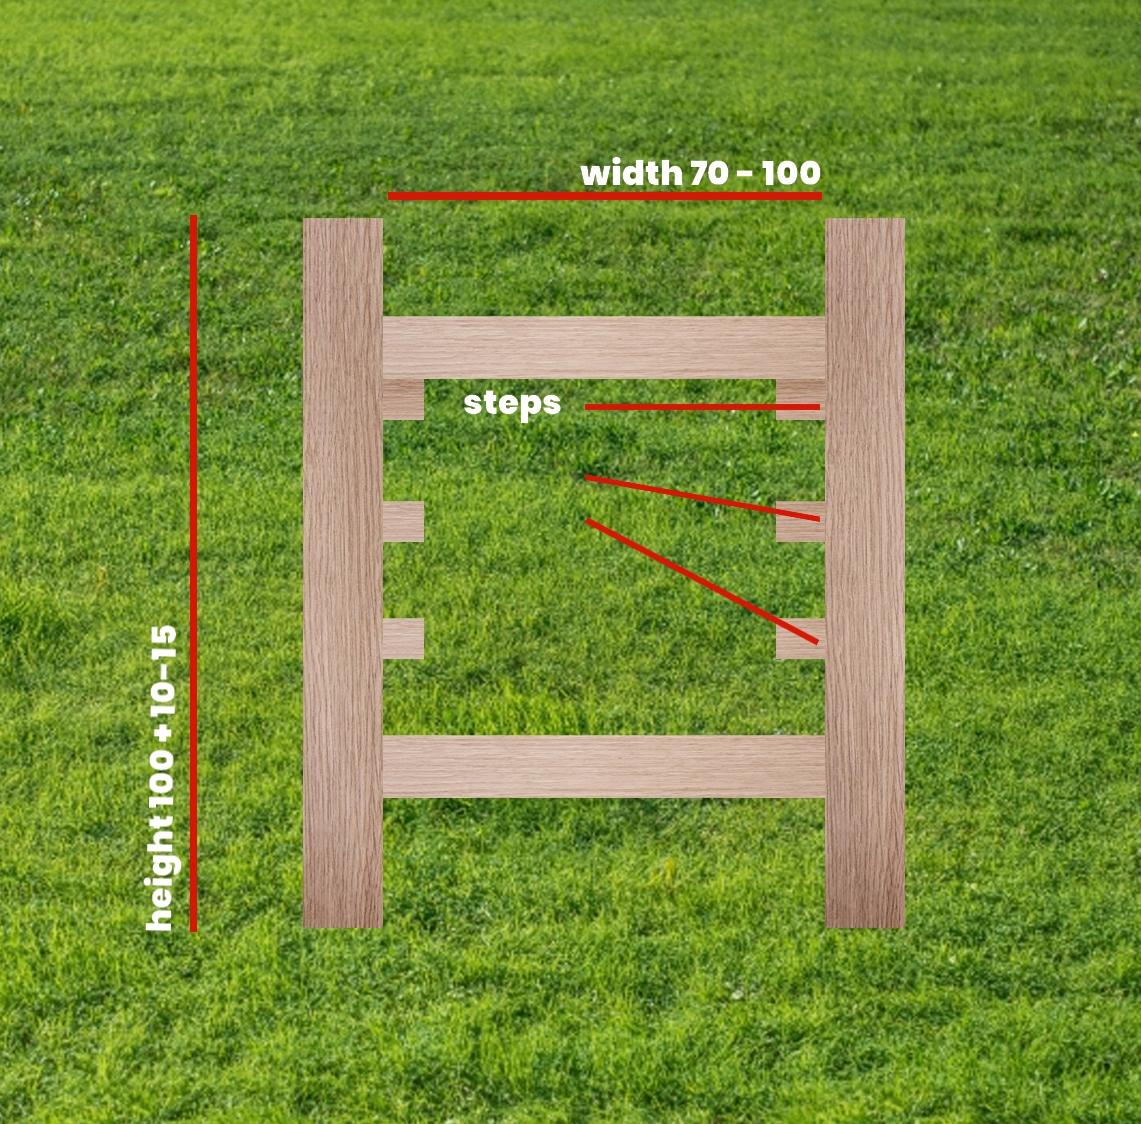
You will need 2 sidebars and 2 bars between one base bar on the bottom and one adjustable bar on top to make a high jump. First, measure the desired width of the high jump. Ensure it’s not too narrow so your dog doesn’t have difficulty jumping over it. 70 cm suits smaller dogs but can go up to 100 for larger ones. Dig 2 deep holes where the sidebars will go. The deeper the hole – the sturdier. If you don’t want any holes in your lawn, that won’t be a problem – you can always build a base for the high jump to stand on. The sidebars can be made from 2 4×4 wooden blocks, each about 1 meter long. Add an extra 10-15 cm to go into the ground. The width of the base bar and adjustable bar must be equal to the width between the side bars. Think of a minimal height for the jump. The optimal height is about 30-40 cm off the ground. Fit the base bar between the sidebar sand and nail it in place. Now, let’s make the top bar. You must make a couple of small wooden blocks for the adjustable bar to make the “steps.” The “steps” will support and adjust the top bar to place it higher or lower. Nail or glue an even number of “steps” on each side, and make sure that the highest bar is placed realistically, meaning that your dog can jump over it.
2. Climber

A climber is also easy to make and only requires 3 types of details: 2 large sheets of wood, a base that goes underneath and some wooden blocks. Start by taking the 2 flat rectangular sheets to form a triangular peak and connect them. You choose any angle and make it as steep or as low as you like. Then, take a wooden board the same height as your peak. It will act as a support for the whole construction. Next, you have to take steps for your dog to climb. You don’t need anything too elaborate; some wooden 3×3 blocks or planks will do the trick. The steps must be the same width as the sheets and evenly placed.
3. Hoop Jump
For the hoop jump, you will need 2 wooden blocks for the base, some rope, and a hula-hoop. You can use an old hula-hoop if you have one at home or buy a new one. To make the base of the hoop jump, just follow the same instructions for building the high jump base. Then, add another block on top between the 2 side blocks. Screw in 3 eye screws for the rope, one on top and 2 on each side. Then, place a hula-hoop in the middle and secure it with rope.
4. Weave poles
To make this obstacle, you will need 1 long beam or plank, at least 6 wooden beams (about 1 meter tall) and metal connectors for each one. The support beam should be heavy and sturdy to support the rest of the beams that will be connected to it. To make it even sturdier, add a couple of perpendicular beams – one on each side and one in the middle. Place the top beams at an even distance and connect them to the beam. Secure them in place using screws and metal connectors.
There you have it! Now you have a nice place to spend quality time with your four-legged friend.
Features for Your Dog Training Park
A well-designed dog training park should include various features to engage and challenge your pet. Here are some key elements to consider:
- Fencing: A secure fence is crucial to keep your dog safe and contained within the training area. Choose a sturdy material like wood or chain-link, and ensure it’s tall enough to prevent jumping or climbing.
- Agility Equipment: Incorporate obstacles like jumps, tunnels, and weave poles to help improve your dog’s coordination and obedience. You can purchase pre-made equipment or build your own using simple materials like PVC pipes and wooden planks.
- Play Area: Designate a space for interactive play, such as fetch or tug-of-war. This area should be open and free of obstacles.
- Rest Zone: Include a shaded area where your dog can relax and cool down after training sessions. A simple canopy or small doghouse can provide shelter from the sun and rain.
- Water Station: Keep your furry friend hydrated by installing a fountain or placing a large, sturdy water bowl in the park.
- Storage: Add a small shed or weatherproof container to store training equipment, toys, and treats.
Choosing the Right Surfaces
The ground surface of your dog training park is an important consideration. A mix of surfaces can provide different textures and experiences for your dog. Here’s a table comparing some common surface options:
| Surface Type | Pros | Cons |
|---|---|---|
| Grass | Natural, soft, good drainage | Requires maintenance, can become muddy |
| Artificial Turf | Low maintenance, clean | It can be expensive and may have strong odor initially |
| Wood Chips | Soft, natural look | Regular replenishment can attract pests |
| Rubber Mulch | Durable, shock-absorbing | It can be expensive and may have a strong odor initially |
Making the Most of Your Dog Training Park
With your new dog training park complete, it’s time to put it to good use. Start by slowly introducing your dog to the park, allowing them to explore and get comfortable with the new environment. Begin with basic obedience training and gradually introduce more complex activities and equipment.
Remember to keep training sessions fun and rewarding for your dog. Use positive reinforcement techniques and plenty of praise and treats. Vary your training routines to keep your dog engaged and prevent boredom.
A backyard dog training park is a wonderful investment in your pet’s health, happiness, and well-being. With careful planning and regular use, it can become a cherished space for you and your furry friend to enjoy for years.